The second in our series on how to use our HomeSwapper website, looks at how to create a MultiSwap. We have put together a step-by-step guide to help you form a chain of swappers:
What is a MultiSwap?
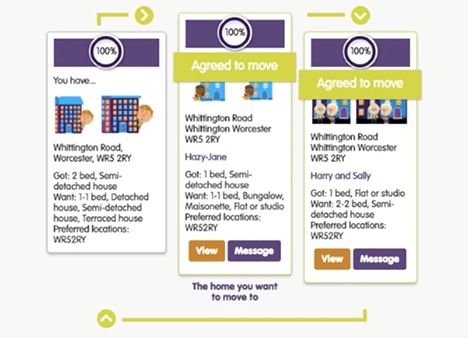
A MultiSwap is a swap involving more than two homes, where a swapper moves into the home of a person who is moving into the home of another person, and so on.
This means that although a swapper might not want to move into your home, there may be a property out there that they do want to live in, and whose current tenants want to move to your home. So everyone gets the home they want!
A MultiSwap could look like this:
Shortcut
Dashboard > Matches > Find a match > MultiSwaps > Search
How to create a MultiSwap
There are two types of MultiSwap on HomeSwapper: One that we can create for you automatically and one that you can build yourself.
A MultiSwap chain is a pre-made chain for you created by the HomeSwapper system. You can view up to 9 MultiSwaps in this with a maximum of 5 homes in each chain. All properties are selected based on ‘best match’ for each tenants’ saved details.
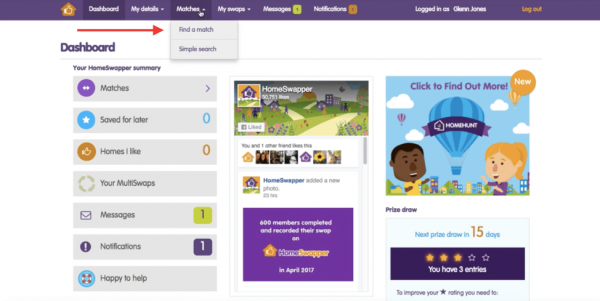
To create this type of chain on a laptop or computer, go to your Dashboard and on the top menu click the Matches tab and click on Find a match, as shown in the image with the arrow below:
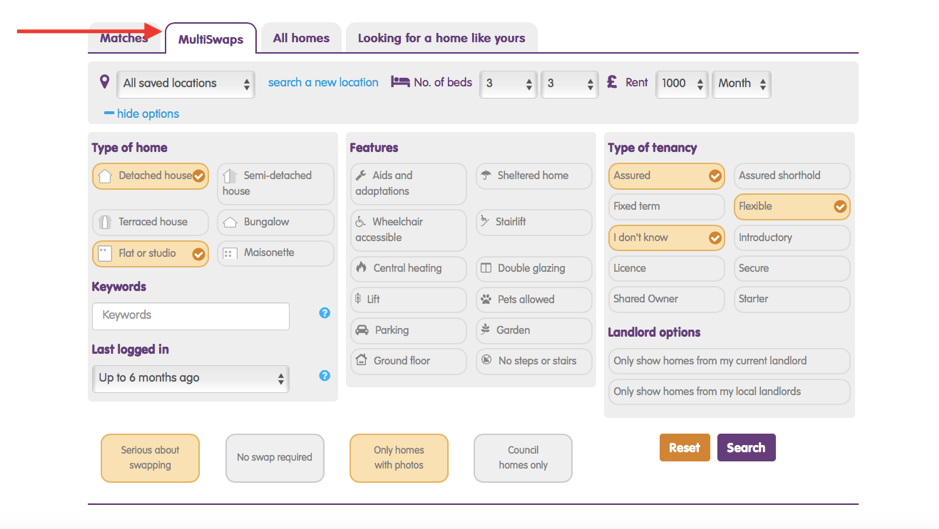
On the Find a match page, go into the MultiSwaps tab. Fill out the details for where you want to search for a home and click Search
HomeSwapper will now do all the work for you to find possible MultiSwaps matching your criteria and we’ll message you when we’re done searching. You can click on the link in the message, which will show the possible homes you could move into.
Take a look through these adverts and once you’ve found the one for you, simply click on the Create MultiSwap button and we’ll show you a possible MultiSwap chain:

Shortcut
About Me > Choose Username > Upload your photo > Add people living With you > NEXT
About Me page
You can now choose your display name. This is how other users will see you on HomeSwapper. Make sure you put a nice photo up, so swappers know who you are!
You can do this by clicking where the arrow shows in the image below:
Now enter how many people you’ll be living with in your new home. This information is shared with your landlord to help you find swaps with the number of bedrooms allowed. Don’t forget to include yourself in the people count for your home! On the following screen you’ll be asked for the date of birth of any single people in your household, so make sure you have this to hand.

Shortcut
Home I Want > Choose Area > Choose type of home > How many bedrooms? > Choose rent budget > Select special requests > NEXT
The Home I Want section
Now it’s time to think about the home you want. There are five easy steps to complete.
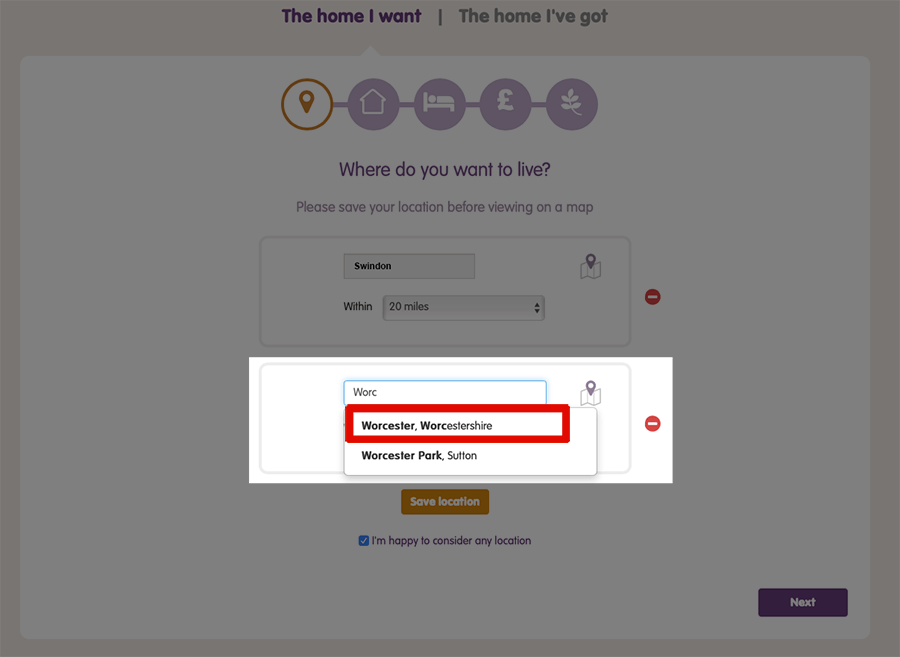
Step 1. Where do you want to live? Type in the city, town or location you want to live in. Then select how far out of that specific area you’re happy to look. Remember that the greater your search area, the more chance you’ll have of finding a swap. Then click Save.
You can add as many locations as you like here, or if you’re happy to live anywhere within the UK, you can simply tick this box underneath the location-finder.
When you’ve added all the locations you want, click NEXT
Step 2. What kind of home do you want? There are six types to choose from. Just highlight which you want – choose as many as you like.
Now click the NEXT button.
Step 3. On the next screen you select how many bedrooms you want.
Step 4. Enter the amount of rent you want to pay.
Be careful here that you choose the correct amount for either the week or the month as shown with the arrow in the image below:
Step 5. Here you can highlight any particular features you want such as pets, wheelchair access or step free. There’s also a box to type in any specific request you have.
Finally, click the NEXT button
Shortcut
Home I’ve Got > Enter where I live > Add landlord > Enter tenancy > Choose type of home > How many bedrooms? > Add rent > Mark special features > Upload photo’s > FINISH
The Home I’ve Got
Now it’s time to think about the home you’ve got and how to make it really attractive for potential Swappers. There are six more steps in this part, which is really important. Don’t worry, it won’t take too long and you can always change the details afterwards.
Step 1. Where do you live? Type in your Post Code and click the Find Address button.
Select your house or flat number from the dropdown list.
Type in the name of your landlord and choose from the list.
Now, select the Type of Tenancy from the list of 10 options. This is really important because when you swap homes, you usually swap the tenancy agreement you have with the landlord as well. This means your rights could change so it’s important to get those details on HomeSwapper. Contact your landlord to check.
Step 2. What kind of home do you live in? Just like before, highlight the property you currently have from the six options.
Now click the NEXT button.
Step 3. From the list on the next screen, select how many bedrooms you have. Now click the NEXT button.
Step 4. Enter how much the rent costs. Don’t forget to mark whether it’s weekly or monthly. The next question is about Housing Benefit. Simply mark whether you qualify and whether it’s paid as Universal Credit or not.
Now click the NEXT button
Step 5. Now it’s your turn to highlight the features you have, just as you did before. Do you have step free access? Is it pet friendly? Do you have double glazing? Mark all the useful features you have and include anything else in the box at the bottom. Now click the NEXT button.
Step 6: You’re now nearly finished but this is one of the most important parts of your listing – the photographs. Click the +add a photo button for every photo you upload. Make sure you put at least three images up as these are the top thing people look for. You can read more of our helpful articles on photography elsewhere in the Help Centre.
Now, lastly click the NEXT button
And that’s it. You’re now officially on HomeSwapper. Good Luck!
The HomeSwapper Customer Support team are always on hand to give advice and tips on how to get the most from HomeSwapper. They deal with Swappers every day and have a unique insight and view on the thousands of successful swaps that take place on HomeSwapper.